XRP Overview
What is the XRP Robot?
The XRP is a compact robot designed to teach the fundamentals of writing software and using sensors to accomplish tasks. A key feature of the XRP is its support for multiple programming languages, providing a versatile learning path.
We will begin with Blockly, a visual programming language where you build programs by connecting blocks, much like assembling LEGOs. This approach is excellent for learning core coding concepts, though it has its limitations.
After mastering Blockly, we will transition to C++, the same language used for our full-sized competition robot. The benefit of this is that the XRP C++ code shares the same structure as our main robot's code. This means nearly every skill you develop with the XRP is directly transferable to programming the competition robot.
Now, let's get started!
for more details on the XRP robot visit XRP Overview
Robot Overview
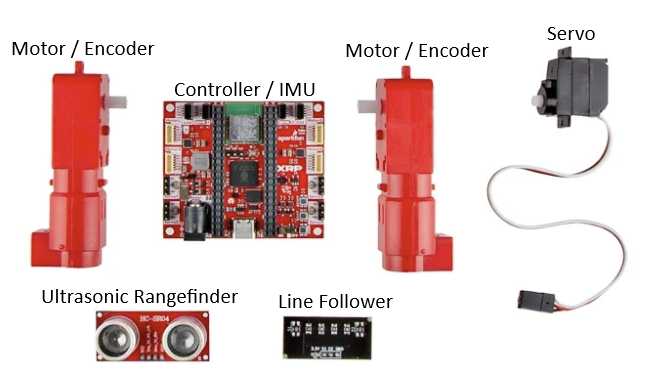
To move and interact with its environment, the XRP comes equipped with several components:
-
Motors: The XRP has two motors that drive the wheels, allowing it to move forward, backward, and turn.
-
Encoders: Each motor has a built-in encoder. These sensors measure how far the wheels have turned, which allows for precise control over the robot's movement and distance traveled. The encoder are built into the motors.
-
6-axis IMU (Inertial Measurement Unit): Located on the main controller board, the IMU measures the robot's linear acceleration and rotational velocity across three axes. This is useful for detecting movement, orientation, and tilt.
-
Ultrasonic Rangefinder: This sensor measures the distance to objects directly in front of it by sending out sound waves and measuring how long they take to return. It's great for obstacle avoidance.
-
Line Follower: The kit includes a line follower sensor. This sensor can detect a dark line on a light surface (or vice-versa), allowing the robot to be programmed to follow a path.
-
Servo Outputs: The controller board includes four outputs to control servos. Servos are small motors that allow for precise control of angular position, making them ideal for tasks like operating a gripper or a small arm.
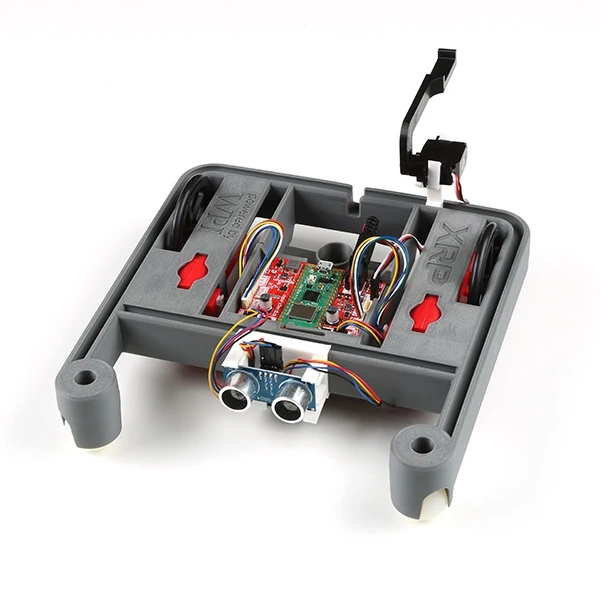
Assembling your XRP robot
Click the video link below for instructions on assembling your XRP robot
XRP Computer Setup
This should be done already on the Argos laptop. If you are having issues please contact a mentor.
If you want to use the XRP robot on your own computer, you'll need to set it up. Follow the instructions on WPILib Setup.
Since we write our software in C++, make sure you follow the Additional C++ Installation for Simulation.
When installing Visual Studio, select the Community 2022 version (shown below), not 2026.

Imaging XRP Robot
This should be done by a mentor and should already be done on your robot.
For instructions on how to setup the XRP robot for WPILib software, see WPILib Imaging or the video below